# How to build a Chromeless UI

A Chromeless UI comes into play when your envisioned video player UI too different from the default [THEOplayer UI](https://docs-preview.optiview.dolby.com/pr-863/theoplayer/v10/how-to-guides/ui/introduction.md).

Building a Chromeless UI means building a brand-new video player UI from scratch. You achieve this by implementing your own custom UI components, and by associating those components with the appropriate THEOplayer API. The screenshot below visualizes such a Chromeless UI -- albeit not the most pretty one.
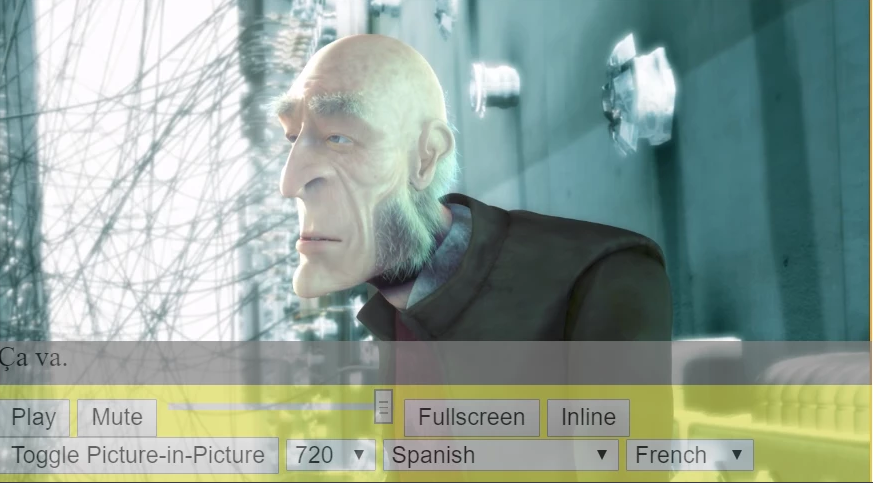
![Chromeless UI Layout](/pr-863/assets/images/chromeless-ui-7-4025542f4b233096015b9e6ecce5bcd5.png "Chromeless UI Layout")

A Chromeless UI gives you complete control over your full UI and UX, but it also means that you responsible for implementing your full UI and UX. Achieving this feat requires you to have an adequate grasp on the video player architecture and its underlying API.

The goal of this guide is to advance your understanding on how to connect the dots between custom components and the THEOplayer API. For example, this guide will explain to which THEOplayer APIs you could map your custom play button.

*Tip: go to our Chromeless UI samples for Web, [iOS](https://github.com/THEOplayer/samples-ios-sdk/tree/master/Custom-UI), [Android](https://github.com/THEOplayer/samples-android-sdk/tree/master/Custom-UI) and [Roku](https://github.com/THEOplayer/samples-roku-sdk/tree/master/basic-playback-app/components/ChromelessView) on GitHub if you want to go straight to completed code samples.*

You can create a Chromeless UI on all THEOplayer SDKs.

## Creating a Chromeless player instance

The article will often mention `player` variable. This `player` variable is a "Chromeless" instance created through the THEOplayer constructor.

#### Web SDK

The API reference on creating a Chromeless player instance for the THEOplayer Web SDK is located at [ChromelessPlayer](https://docs-preview.optiview.dolby.com/pr-863/theoplayer/v10/api-reference/web/classes/ChromelessPlayer#constructor).

When you're implementing a Chromeless UI, you don't need to include the THEOplayer CSS library (i.e. `ui.css`) mentioned in our [getting started guide](https://docs-preview.optiview.dolby.com/pr-863/theoplayer/v10/getting-started/sdks/web/getting-started.md), nor do you need to specify some default CSS classed.

Additionally, instead of including `THEOplayer.js` as mentioned in our [getting started guide](https://docs-preview.optiview.dolby.com/pr-863/theoplayer/v10/getting-started/sdks/web/getting-started.md), you'll include `THEOplayer.chromeless.js`, as demonstrated by the snippet below.

```html
<script type="text/javascript" src="/path/to/THEOplayer.chromeless.js"></script>
```

The snippet below demonstrates how you set up a Chromeless player instance through the THEOplayer Web SDK API.

```javascript
var element = document.querySelector('.theoplayer-container');
var player = new THEOplayer.ChromelessPlayer(element, {
  libraryLocation: '/path/to/your-theoplayer-folder/',
  license: 'your_license_string',
});
```

Notice how this snippet uses `ChromelessPlayer` instead of `Player`. The `element` variable refers to an existing DOM element. If we modified our template in the [getting started guide](https://docs-preview.optiview.dolby.com/pr-863/theoplayer/v10/getting-started/sdks/web/getting-started.md) to be Chromeless, it would resemble the code below.

```html
<!doctype html>
<html lang="en">
  <head>
    <meta charset="UTF-8" />
    <title>THEOplayer Chromeless</title>
    <meta name="viewport" content="width=device-width, initial-scale=1.0" />
  </head>
  <body>
    <div class="theoplayer-container"></div>
    <script type="text/javascript" src="/path/to/THEOplayer.chromeless.js"></script>
    <script>
      var element = document.querySelector('.theoplayer-container');
      var player = new THEOplayer.ChromelessPlayer(element, {
        libraryLocation: '/path/to/your-theoplayer-folder/',
        license: 'your_license_string',
      });
      player.source = {
        sources: [
          {
            src: '//cdn.theoplayer.com/video/star_wars_episode_vii-the_force_awakens_official_comic-con_2015_reel_(2015)/index.m3u8',
            type: 'application/x-mpegurl',
          },
        ],
      };
    </script>
  </body>
</html>
```

Of course, you would still need to apply CSS to style your `theoplayer-container`, and give it a width and height.

##### Legacy Android SDK (4.12.x)

The API reference on creating a Chromeless player instance for the THEOplayer Android SDK is located at [THEOplayerView](https://docs-preview.optiview.dolby.com/pr-863/theoplayer/v10/api-reference/android/com/theoplayer/android/api/THEOplayerView).

When creating an instance, you need to provide a [`THEOplayerConfig`](https://docs-preview.optiview.dolby.com/pr-863/theoplayer/v10/api-reference/android/com/theoplayer/android/api/THEOplayerConfig), and set `chromeless` to `true`. The snippet below demonstrates how to create a Chromeless instance.

```java
THEOplayerConfig config = new THEOplayerConfig.Builder()
        .chromeless(true)
        .license("your_license_string")
        .build();
THEOplayerView theoplayerView = new THEOplayerView(this, config);
Player player = theoplayerView.getPlayer();
```

If you are creating your `THEOplayerView` through XML, then you can specify `app:chromeless="true"` as implemented at <https://github.com/THEOplayer/samples-android-sdk/blob/master/Custom-UI/app/src/main/res/layout/activity_player.xml>.

#### iOS/tvOS SDK and Legacy iOS/tvOS SDK (4.12.x)

The API reference on creating a Chromeless player instance for the THEOplayer iOS SDK is located at [THEOplayer](https://docs-preview.optiview.dolby.com/pr-863/theoplayer/v10/api-reference/ios/Classes/THEOplayer).

When creating an instance, you need to [`THEOplayerConfig`](https://docs-preview.optiview.dolby.com/pr-863/theoplayer/v10/api-reference/ios/Classes/THEOplayerConfiguration), and set `chromeless` to `true`. The snippet below demonstrates how to create a Chromeless instance.

```swift
let config = THEOplayerConfiguration(
    chromeless: true,
    pip: nil,
    license: "your_license_string"
)
let player = THEOplayer(configuration: config)
```

## Using a WebView in legacy Android/iOS SDKs (4.12.x)

As mentioned in our [introduction](https://docs-preview.optiview.dolby.com/pr-863/theoplayer/v10/how-to-guides/ui/introduction.md#ios-and-android-sdk), the legacy Android and iOS SDKs (4.12.x) use a WebView for their default UI. You may leverage this existing WebView to create a custom Chromeless UI for our Android and iOS SDK through a combination of JavaScript, CSS and HTML.

See [our version 4 documentation](https://docs-preview.optiview.dolby.com/pr-863/theoplayer/v4/how-to-guides/ui/how-to-build-chromeless-ui#using-a-webview) for more information.

## Tracking transitions between states

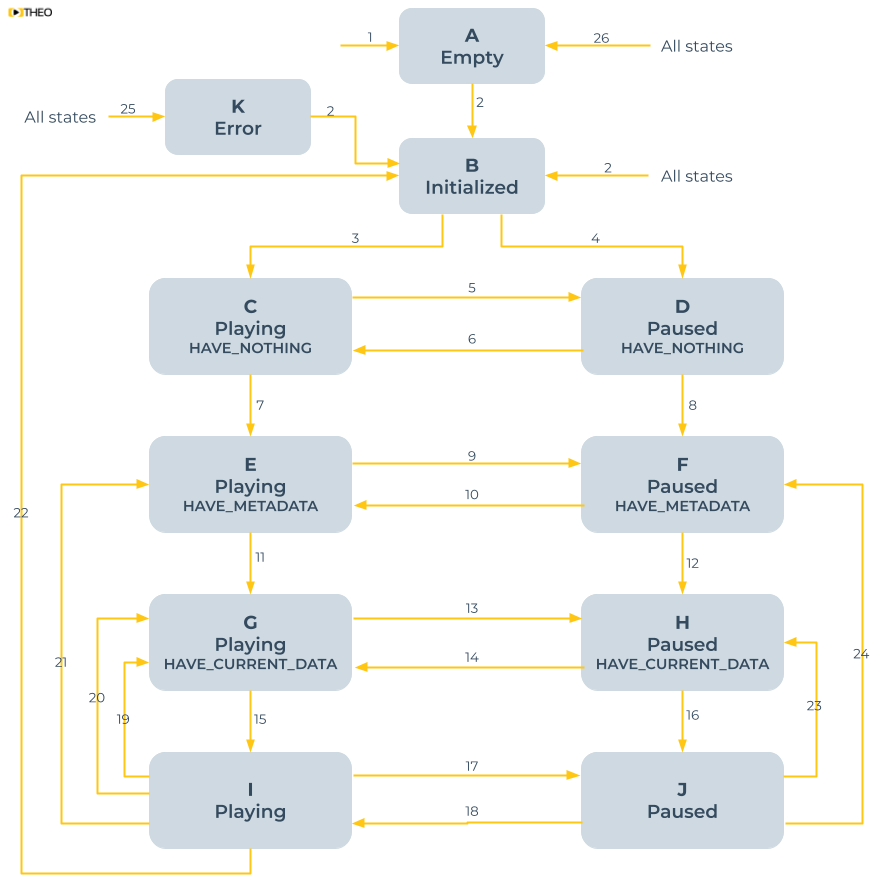
Refer to the article on ["How to track player states"](https://docs-preview.optiview.dolby.com/pr-863/theoplayer/v10/how-to-guides/player/how-to-track-player-states.md) to advance your understanding on video player states. Understanding the video player lifecycle is a vital part of building a Chromeless UI.
![Video Player States](/pr-863/assets/images/player-video-player-states-4f4f37f92d4b03a2c750ce7fe03d0a5a.png "Video Player States")

This article explains how to track the start of a video and its end, but also how to detect buffering, errors and much more. You'll need to implement (some of) these transitions in your Chromeless UI in order to render the appropriate components.

## Mapping components

A video player UI can be dissected into different components (or controls). A component offers context, and it may also offer an action. The "play button" is an example of an action component, but the "current time text" (X in the screenshot below) is a context component.

As a developer, you should understand which controls are out there, and which video player APIs are relevant.

This section addresses the following components:

1. Play button
2. Pause button
3. Volume mute button
4. Volume change button
5. Current time text
6. Duration text
7. Scrub bar
8. Buffered blocks
9. Live button
10. Audio change component
11. Subtitle change component
12. Video quality change component
13. Fullscreen and inline button
14. Picture-in-picture button
15. Chromecast button
16. AirPlay button

Additionally, we'll discuss the following overlays:

1. Subtitle cues
2. Advertisement metadata
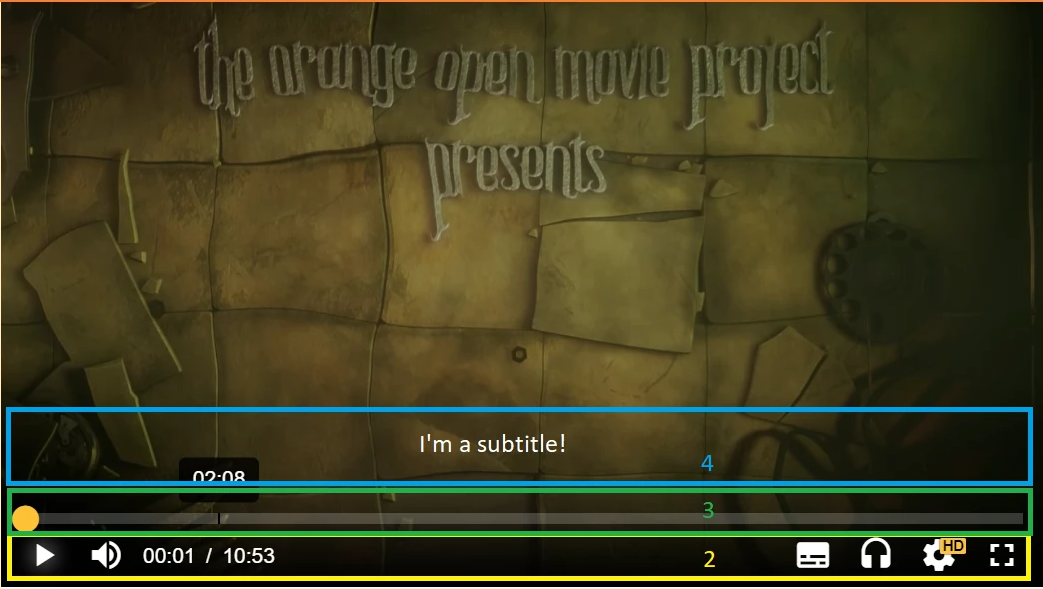
![Chromeless UI Layout](/pr-863/assets/images/chromeless-ui-layout-3642d810cba7de946ee7cb69b7ab238b.png "Chromeless UI Layout")

Instead of providing inline code on this article, we'll refer to other articles as much as possible, because linking the THEOplayer API to your custom components is an application of many of the existing how-to guides for a specific use-case.

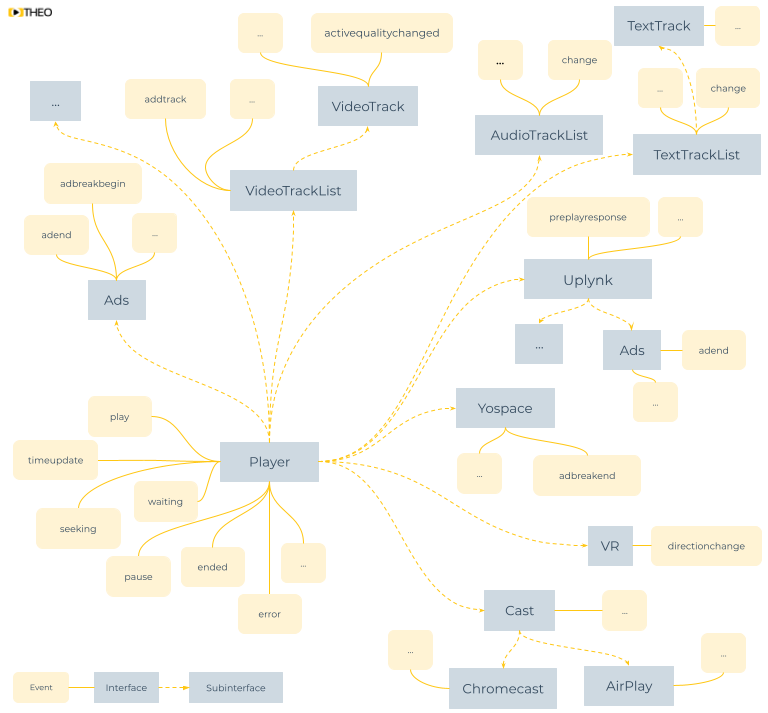
If you know how to navigate our API references, you don't even need this section. The graphic below (originally referenced in ["custom analytics integration"](https://docs-preview.optiview.dolby.com/pr-863/theoplayer/v10/how-to-guides/analytics/custom-analytics-integration.md)) gives a basic overview of many of the relevant interfaces and events.
![THEOplayer API Interfaces and Events](/pr-863/assets/images/analytics-events-185d6ab52b556af08d8300b545ae5876.png "THEOplayer API Interfaces and Events")

### Play button

You should show your play button when you are in a paused state, as described in ["how to track player states"](https://docs-preview.optiview.dolby.com/pr-863/theoplayer/v10/how-to-guides/player/how-to-track-player-states.md). If a viewer clicks your play button, you should call the `play()` on your `player` instance as documented across our [Web](https://docs-preview.optiview.dolby.com/pr-863/theoplayer/v10/api-reference/web/classes/ChromelessPlayer#play), [Android](https://docs-preview.optiview.dolby.com/pr-863/theoplayer/v10/api-reference/android/com/theoplayer/android/api/player/Player#play--) and [iOS](https://docs-preview.optiview.dolby.com/pr-863/theoplayer/v10/api-reference/ios/Classes/THEOplayer#/c:@M@THEOplayerSDK@objc\(cs\)THEOplayer\(im\)play) documentation.

### Pause button

You should show your pause button when you are in a playing state, as described in ["how to track player states"](https://docs-preview.optiview.dolby.com/pr-863/theoplayer/v10/how-to-guides/player/how-to-track-player-states.md). If a viewer clicks your pause button, you should call the `pause()` on your `player` instance as documented across our [Web](https://docs-preview.optiview.dolby.com/pr-863/theoplayer/v10/api-reference/web/classes/ChromelessPlayer#pause), [Android](https://docs-preview.optiview.dolby.com/pr-863/theoplayer/v10/api-reference/android/com/theoplayer/android/api/player/Player#pause--) and [iOS](https://docs-preview.optiview.dolby.com/pr-863/theoplayer/v10/api-reference/ios/Classes/THEOplayer#/c:@M@THEOplayerSDK@objc\(cs\)THEOplayer\(im\)pause) documentation.

### Volume mute button

You can check whether your volume is muted through the `muted` property (or method) on your `player` instance as documented across our [Web](https://docs-preview.optiview.dolby.com/pr-863/theoplayer/v10/api-reference/web/classes/ChromelessPlayer#muted), Android ([isMuted()](https://docs-preview.optiview.dolby.com/pr-863/theoplayer/v10/api-reference/android/com/theoplayer/android/api/player/Player#isMuted--) and [setMuted()](https://docs-preview.optiview.dolby.com/pr-863/theoplayer/v10/api-reference/android/com/theoplayer/android/api/player/Player#setMuted-boolean-)) and [iOS](https://docs-preview.optiview.dolby.com/pr-863/theoplayer/v10/api-reference/ios/Classes/THEOplayer#/s:13THEOplayerSDK0A0C5mutedSbvp) documentation. You should consider showing a different button depending on whether `muted` returns `true` or `false`. If a viewer clicks your mute button, you should set `muted` to `!muted`.

### Volume change button

You can get and set your volume level through the `volume` property (or method) on your `player` instance as documented across our [Web](https://docs-preview.optiview.dolby.com/pr-863/theoplayer/v10/api-reference/web/classes/ChromelessPlayer#volume), Android ([getVolume()](https://docs-preview.optiview.dolby.com/pr-863/theoplayer/v10/api-reference/android/com/theoplayer/android/api/player/Player#getVolume--) and [setVolume()](https://docs-preview.optiview.dolby.com/pr-863/theoplayer/v10/api-reference/android/com/theoplayer/android/api/player/Player#setVolume-double-)) and [iOS](https://docs-preview.optiview.dolby.com/pr-863/theoplayer/v10/api-reference/ios/Classes/THEOplayer#/s:13THEOplayerSDK0A0C6volumeSfvp) documentation. You should consider showing a different button depending on the volume level.

Note that you cannot control the volume level on iOS- and Android-based SDKs as this is delegated to the hardware buttons. You can only toggle the muted state on these SDKs.

### Current time text

You can get the current time through the `currentTime` property (or method) on your `player` instance as documented across our [Web](https://docs-preview.optiview.dolby.com/pr-863/theoplayer/v10/api-reference/web/classes/ChromelessPlayer#currentTime), Android ([requestCurrentTime()](https://docs-preview.optiview.dolby.com/pr-863/theoplayer/v10/api-reference/android/com/theoplayer/android/api/player/Player#requestCurrentTime-com.theoplayer.android.api.player.RequestCallback-) and [setCurrentTime()](https://docs-preview.optiview.dolby.com/pr-863/theoplayer/v10/api-reference/android/com/theoplayer/android/api/player/Player#setCurrentTime-double-)) and iOS ([requestCurrentTime()](https://docs-preview.optiview.dolby.com/pr-863/theoplayer/v10/api-reference/ios/Classes/THEOplayer#/s:13THEOplayerSDK0A0C18requestCurrentTime17completionHandleryySdSg_s5Error_pSgtc_tF) and [setCurrentTime()](https://docs-preview.optiview.dolby.com/pr-863/theoplayer/v10/api-reference/ios/Classes/THEOplayer#/s:13THEOplayerSDK0A0C14setCurrentTime_17completionHandlerySd_yypSg_s5Error_pSgtcSgtF)) documentation.

Note that `currentTime` returns a relative value in seconds. If you are dealing with live streams, you might want to use `currentProgramDateTime` instead, as this returns an absolute value like `"2022-04-01T13:37:42.666Z"`. This property (or method) is especially useful when implementing an [EPG](https://en.wikipedia.org/wiki/Electronic_program_guide) experience.

### Duration text

You can get the duration of a stream through the `duration` property (or method) on your `player` instance as documented across our [Web](https://docs-preview.optiview.dolby.com/pr-863/theoplayer/v10/api-reference/web/classes/ChromelessPlayer#duration), [Android](https://docs-preview.optiview.dolby.com/pr-863/theoplayer/v10/api-reference/android/com/theoplayer/android/api/player/Player#getDuration--) and [iOS](https://docs-preview.optiview.dolby.com/pr-863/theoplayer/v10/api-reference/ios/Classes/THEOplayer#/s:13THEOplayerSDK0A0C8durationSdSgvp) documentation.

The `duration` will return the duration in seconds for VOD streams, and `Infinity` for live streams.

You can calculate the remaining duration by subtracting the `currentTime` from the `duration`.

### Scrub bar

Related to the subsection on "Current time text", you can seek to a different playhead position through the `currentTime` property (or `setCurrentTime()` method) on your `player` instance. Alternatively, for live streams, you may also use `currentProgramDateTime` to seek to absolute playhead positions.

You can only seek to a playhead position that is within any of the time ranges of your `seekable` property (or method) of your `player` instance as documented across our [Web](https://docs-preview.optiview.dolby.com/pr-863/theoplayer/v10/api-reference/web/classes/ChromelessPlayer#seekable), [Android](https://docs-preview.optiview.dolby.com/pr-863/theoplayer/v10/api-reference/android/com/theoplayer/android/api/player/Player#requestSeekable-com.theoplayer.android.api.player.RequestCallback-) and [iOS](https://docs-preview.optiview.dolby.com/pr-863/theoplayer/v10/api-reference/ios/Classes/THEOplayer#/s:13THEOplayerSDK0A0C15requestSeekable17completionHandleryySayAA9TimeRangeCGSg_s5Error_pSgtc_tF) documentation. For example, on the Web SDK, this means that you'll stay between `player.seekable.start(0)` and `player.seekable.end(player.seekable.length-1)`.

You subscribe to the `timeupdate` event to periodically update your scrub bar bullet. This event is dispatched every \~200ms during playback. Refer to our [Web](https://docs-preview.optiview.dolby.com/pr-863/theoplayer/v10/api-reference/web/interfaces/PlayerEventMap#timeupdate), [Android](https://docs-preview.optiview.dolby.com/pr-863/theoplayer/v10/api-reference/android/com/theoplayer/android/api/event/player/PlayerEventTypes#TIMEUPDATE) and [iOS](https://docs-preview.optiview.dolby.com/pr-863/theoplayer/v10/api-reference/ios/Structs/PlayerEventTypes#/s:13THEOplayerSDK16PlayerEventTypesV11TIME_UPDATEAA0D4TypeCyAA010TimeUpdateD0CGvpZ) documentation for more info on this event.

A `seek` event is dispatched when you set a new value for `currentTime` or `currentProgramDateTime`. A `seeked` event is dispatched when the seek was successful. Refer to our [Web](https://docs-preview.optiview.dolby.com/pr-863/theoplayer/v10/api-reference/web/interfaces/PlayerEventMap#seeking), [Android](https://docs-preview.optiview.dolby.com/pr-863/theoplayer/v10/api-reference/android/com/theoplayer/android/api/event/player/PlayerEventTypes#SEEKING) and [iOS](https://docs-preview.optiview.dolby.com/pr-863/theoplayer/v10/api-reference/ios/Structs/PlayerEventTypes#/s:13THEOplayerSDK16PlayerEventTypesV7SEEKINGAA0D4TypeCyAA07SeekingD0CGvpZ) documentation for more info on these events. You should consider displaying a "stalling icon" between these two events.

#### Buffered blocks

You may also want to annotate parts of the scrub bar that have already been buffered. When the viewer seeks to a buffered block playback immediately starts.

You can track information on what's being buffered through the `progress` event. Refer to our [Web](https://docs-preview.optiview.dolby.com/pr-863/theoplayer/v10/api-reference/web/interfaces/PlayerEventMap#progress), [Android](https://docs-preview.optiview.dolby.com/pr-863/theoplayer/v10/api-reference/android/com/theoplayer/android/api/event/player/PlayerEventTypes#PROGRESS) and [iOS](https://docs-preview.optiview.dolby.com/pr-863/theoplayer/v10/api-reference/ios/Structs/PlayerEventTypes#/s:13THEOplayerSDK16PlayerEventTypesV8PROGRESSAA0D4TypeCyAA08ProgressD0CGvpZ) documentation for more info on this event. In the callback of the `progress` event, you will want to query the `buffered` property (or method) to iterate through the available buffered time ranges. The `buffered` property (or method) is described in our [Web](https://docs-preview.optiview.dolby.com/pr-863/theoplayer/v10/api-reference/web/classes/ChromelessPlayer#buffered), [Android](https://docs-preview.optiview.dolby.com/pr-863/theoplayer/v10/api-reference/android/com/theoplayer/android/api/player/Player#requestBuffered-com.theoplayer.android.api.player.RequestCallback-) and [iOS](https://docs-preview.optiview.dolby.com/pr-863/theoplayer/v10/api-reference/ios/Classes/THEOplayer#/s:13THEOplayerSDK0A0C15requestBuffered17completionHandleryySayAA9TimeRangeCGSg_s5Error_pSgtc_tF) documentation.

### Live button

A stream is a live stream when your `duration` property (or method) returns `Infinity`. If you want to implement a button that takes you to the "most live point" when clicked, then you set `currentTime` to the maximum `seekable` `end` time. For example, on the Web SDK, you would call `player.currentTime = player.seekable.end(player.seekable.length-1)`.

### Audio change component

Refer to the article on ["how to detect audio tracks"](https://docs-preview.optiview.dolby.com/pr-863/theoplayer/v10/how-to-guides/mediatrack/how-to-detect-audio-tracks.md) to know how to detect the available audio tracks. You'll need this article to know which audio tracks are part of your stream.

Refer to the article on ["how to enable and disable audio tracks"](https://docs-preview.optiview.dolby.com/pr-863/theoplayer/v10/how-to-guides/mediatrack/how-to-enable-disable-audio-tracks.md) to know how to enable or disable another audio track. You'll need this article to enable another audio track.

Refer to the article on ["how to detect audio track changes"](https://docs-preview.optiview.dolby.com/pr-863/theoplayer/v10/how-to-guides/mediatrack/how-to-detect-audio-track-changes.md) to know how to detect when an audio track has been enabled or disabled. You'll need this article to correctly annotate your UI.

### Subtitle change component

Refer to the article on ["how to detect text tracks"](https://docs-preview.optiview.dolby.com/pr-863/theoplayer/v10/how-to-guides/texttrack/how-to-programmatically-detect-text-tracks.md) to know how to detect the available text tracks. You'll need this article to know which subtitles and closed captions are part of your stream.

Refer to the article on ["how to enable and disable text tracks"](https://docs-preview.optiview.dolby.com/pr-863/theoplayer/v10/how-to-guides/texttrack/how-to-programmatically-disable-text-tracks.md) to know how to enable or disable another text track.

Refer to the article on ["how to detect text track changes"](https://docs-preview.optiview.dolby.com/pr-863/theoplayer/v10/how-to-guides/texttrack/how-to-detect-text-track-changes.md) to know how to detect when a text track has been enabled or disabled. You'll need this article to correctly annotate your UI.

### Video quality change component

Refer to the article on ["how to detect video track qualities"](https://docs-preview.optiview.dolby.com/pr-863/theoplayer/v10/how-to-guides/mediatrack/how-to-detect-video-track-qualities.md) to know how to detect the available video track qualities. You'll need this article to know which video qualities are part of your stream.

Refer to the article on ["how to select video track quality"](https://docs-preview.optiview.dolby.com/pr-863/theoplayer/v10/how-to-guides/mediatrack/how-to-select-video-track-quality.md) to know how to enable another video track quality.

Refer to the article on ["how to detect video track quality changes"](https://docs-preview.optiview.dolby.com/pr-863/theoplayer/v10/how-to-guides/mediatrack/how-to-detect-video-track-quality-changes.md) to know how to detect when a specific video track quality has become active. You'll need this article to correctly annotate your UI.

### Fullscreen and inline button

Getting your video player in and out fullscreen requires some getting used to, and differs a bit across SDKs.

#### Web SDK

You cannot use our [`Presentation API`](https://docs-preview.optiview.dolby.com/pr-863/theoplayer/v10/api-reference/web/interfaces/Presentation) to switch between fullscreen, inline and picture-in-picture. Instead, you need to implement your own fullscreen handling.

One approach to achieve this is by using the `Fullscreen API` as described at <https://developer.mozilla.org/en-US/docs/Web/API/Fullscreen_API>. Additionally, to deal with iOS browsers, you can leverage [`webkitEnterFullscreen()`](https://developer.apple.com/documentation/webkitjs/htmlvideoelement/1633500-webkitenterfullscreen), or resize your video player container to a 100% width and height.

#### Android SDK

You cannot use our ['FullscreenManager API\`](https://docs-preview.optiview.dolby.com/pr-863/theoplayer/v10/api-reference/android/com/theoplayer/android/api/fullscreen/FullScreenManager) to switch between fullscreen and inline. Instead, you need to implement your own fullscreen handling, as well as any associated orientation changes.

Refer to <https://developer.android.com/training/system-ui/immersive> for more information on implementing your own fullscreen handling.

#### iOS/tvOS SDK and Legacy iOS/tvOS SDK (4.12.x)

You may use the [`presentationMode`](https://docs-preview.optiview.dolby.com/pr-863/theoplayer/v10/api-reference/ios/Classes/THEOplayer#/s:13THEOplayerSDK0A0C16presentationModeAA012PresentationD0Ovp) property of the `player` instance, as demonstrated in the snippet below.

```swift
if (player.presentationMode == PresentationMode.fullscreen) {
    player.presentationMode = PresentationMode.inline
} else {
    player.presentationMode = PresentationMode.fullscreen
}
```

You may also use [`fullscreenOrientationCoupling`](https://docs-preview.optiview.dolby.com/pr-863/theoplayer/v10/api-reference/ios/Classes/THEOplayer#/s:13THEOplayerSDK0A0C29fullscreenOrientationCouplingSbvp) to automatically enter fullscreen when the viewer goes into landscape mode.

Forcing the video player to rotate into landscape when you hit the fullscreen button in portrait mode is something that you need to implement on top of THEOplayer. (For example through a combination of [`UIDevice`](https://developer.apple.com/documentation/uikit/uidevice) and [`UIInterfaceOrientation`](https://developer.apple.com/documentation/uikit/uiinterfaceorientation).)

Do note that when you leverage our `presentationMode` you must add your custom components as subviews of the `THEOplayerView`, because your components won't remain visible otherwise. In other words, you'll have to identify the appropriate subview X of the view Y to which you have (indirectly) added your `player` instance as a subview X. (You do this by querying the subviews of view Y.)

You may also implement fullscreen management on top of THEOplayer. This is worth considering if you want more control and flexibility.

### Picture-in-picture button

You should implement your Picture-in-Picture UI and UX independently of THEOplayer, regardless of whether you're considering "in-app" picture-in-picture or "out-of-app" picture-in-picture. The [THEOplayer Picture-in-Picture API](https://docs-preview.optiview.dolby.com/pr-863/theoplayer/v10/how-to-guides/miscellaneous/picture-in-picture.md) is not available for Chromeless players.

To get the active video element on the THEOplayer Web SDK you may query `player.element.querySelectorAll('video[src]')[0]`.

Related resources:

* <https://developers.google.com/web/updates/2017/09/picture-in-picture>
* <https://developer.apple.com/documentation/webkitjs/adding_picture_in_picture_to_your_safari_media_controls>
* <https://developer.android.com/guide/topics/ui/picture-in-picture>
* <https://developer.apple.com/documentation/avkit/adopting_picture_in_picture_in_a_custom_player>

Note that it might not be possible to implement out-of-app Picture-in-Picture on the THEOplayer iOS SDK.

### Chromecast button

Refer to our [introduction on Chromecast](https://docs-preview.optiview.dolby.com/pr-863/theoplayer/v10/how-to-guides/cast/chromecast/introduction.md) to know how to track the availability of Chromecast, and how to start and stop a Chromecast session.

### AirPlay button

Refer to our [introduction on AirPlay](https://docs-preview.optiview.dolby.com/pr-863/theoplayer/v10/how-to-guides/cast/airplay/introduction.md) to know how to track the availability of AirPlay, and how to start and stop an AirPlay session.

### Subtitle cues

You may still leverage THEOplayer's default rendering of subtitles (and closed captions) in your Chromeless UI. This may require some extra styling though, depending on your SDK. For example, on the Web SDK, you may have to set a default `font-size` through CSS, as demonstrated in the snippet below.

```css
.theoplayer-texttracks * {
  font-size: 1em !important;
}
```

So what's the alternative? Instead of using THEOplayer's default rendering, you can programmatically detect when a subtitle (and closed captions) cue should appear and disappear, as explained in ["how to detect active text track cues"](https://docs-preview.optiview.dolby.com/pr-863/theoplayer/v10/how-to-guides/texttrack/how-to-detect-active-text-track-cues.md). You could insert the cue when it should appear, and remove it when it should disappear. This alternative makes you fully responsible for the rendering and styling, and gives you total control over it.

### Advertisement metadata

When playing back advertisements, you might want to overlay a countdown, show a skip button after some seconds, insert ad markers in the scrub bar, and achieve other use cases.

If you use [Google IMA](https://docs-preview.optiview.dolby.com/pr-863/theoplayer/v10/how-to-guides/ads/google-ima.md) for client-side ad-insertion, then this integration might already take care of some default UI customization.

If you are using THEOplayer's [default ad integration](https://docs-preview.optiview.dolby.com/pr-863/theoplayer/v10/how-to-guides/ads/how-to-set-up-vast-and-vmap.md) for client-side ad-insertion, then you need to [subscribe to the appropriate ad events](https://docs-preview.optiview.dolby.com/pr-863/theoplayer/v10/how-to-guides/ads/how-to-subscribe-to-ad-events.md), and apply your UI and UX in the callbacks of these events.

Similarly, if you're doing server-side ad-insertion, you also need to apply your UI and UX in the callbacks of your ad events.

## Sample code

The following subsections help you get started on our SDKs.

### Web SDK

The sample code at <https://jsfiddle.net/thijsl/1xbk9csq/1/> may help you get bootstrapped on our Web SDK. (Note that this sample code doesn't necessarily demonstrate best practices.)

### Android SDK

The GitHub project at <https://github.com/THEOplayer/samples-android-sdk/tree/master/Custom-UI> provides a basic implementation of a Chromeless UI on the Android SDK.

### iOS/tvOS SDK and Legacy iOS/tvOS SDK (4.12.x)

The GitHub project at <https://github.com/THEOplayer/samples-ios-sdk/tree/master/Custom-UI> provides a basic implementation of a Chromeless UI on the iOS SDK.

### Roku SDK

The GitHub project at <https://github.com/THEOplayer/samples-roku-sdk/tree/master/basic-playback-app/components/ChromelessView> provides a basic implementation of a Chromeless UI on the Roku SDK.

## UX Enhancements

You can make your user-experience more appealing through various enhancements. For example, when the player is out of video data and is waiting for additional content you could show a 'loading' indication.

Below are some common UX enhancements to consider:

1. Loading spinner: provide an indication when no video data is available.
2. Poster: show a poster (thumbnail) before initial play-request, and when the video is complete.
3. Auto next: when approaching the end, render a clickable overlay that allows the viewer to navigate to the next stream. Automatically play this stream when the current stream ends.
4. Skip intro: render a clickable button to skip the (ongoing) intro.
5. Ad countdown: overlay the remaining time of the ongoing ad break.
6. Ad markers: indicate the position of ad breaks in the scrub bar.

## Error handling

A UI should also be capable of handling errors and informing the viewer. Refer to our [introduction on errors](https://docs-preview.optiview.dolby.com/pr-863/theoplayer/v10/how-to-guides/miscellaneous/error/introduction.md) to further explore this topic.

## Roku SDK

This subsection gets you started on implementing a Chromeless UI on our Roku SDK.

* [Display Chromeless player](#display-chromeless-player)
* [Control bar and Buttons](#control-bar-play-pause-stop-buttons)
* [Switch Audio or Text Tracks](#control-bar-switch-audio-or-text-tracks)

This section will give you an overview on how custom controls can be integrated with THEOplayer API and also a brief introduction to BrightScript and SceneGraph. We will create play, pause, stop buttons, add audio and text tracks management menu and create a simple timeline.

### Display chromeless player

To display the video in chromeless THEOplayer we have to take a few steps:

Include and add the instance of THEOplayer.

```xml
  <THEOsdk:THEOplayer id="TestPlayer" controls="false"/>
```

Set the "controls" attribute to "false" to hide all default controls.

```brightscript
function Init()
    m.player = m.top.findNode("TestPlayer")
    m.player.configuration = {
      "license": "" ' put the THEOplayer license between apostrophes
    }
    ' we can go chromeless both via XML or Brightscript'
    ' m.player.controls = false
end function
```

To set the player source, you can create the following function and then just call it inside the "init" function.

```brightscript
function setSource()
    sourceDescription = {
        "sources": [
            {
                "src": "http://cdn.theoplayer.com/video/star_wars_episode_vii-the_force_awakens_official_comic-con_2015_reel_(2015)/index.m3u8",
                "type": "application/x-mpegURL"
            }
        ]
    }
    m.player.source = sourceDescription
    m.player.source.Live = false
    m.player.source.LiveBoundsPauseBehavior = "pause"
end function
```

To make sure that the player will be displayed in a proper position you can set a destination rectangle. In our example we will display the video in a rectangle (1600x800) positioned in the middle of the screen using the "setDestinationRectangle" THEOplayer method.

```brightscript
function setupPlayerPosition()
    uiRes = m.top.getScene().currentDesignResolution
    m.uiRes = uiRes
    playerRect = {
        width: 1600,
        height: 800,
        x: (m.uiRes.width - 1600) / 2,
        y: (m.uiRes.height - 800) / 2
    }
    m.player.callFunc("setDestinationRectangle", playerRect)
end function
```

When all is set up, all we have to do is to play the video using the "play" method.

```brightscript
m.player.callFunc("play")
```

**Notice: The "play" method call is mandatory, otherwise the video playback won’t start and users won’t be able to use remote controls.**

Below you can see the whole working example. The BrightScript code in this snippet is added inside the component xml file, but you can easily extract the logic part to separate ".brs" file by using "script" tag with a specified "uri" field.

```xml
<?xml version="1.0" encoding="utf-8" ?>
<component name="TestScene" extends="Scene">
    <interface>

    </interface>

    <script type = "text/brightscript" >

        <![CDATA[

        function Init()
            m.player = m.top.findNode("TestPlayer")
            m.player.configuration = {
              "license": "" ' put the THEOplayer license between apostrophes
            }
            ' we can go chromeless both via XML or Brightscript'
            ' m.player.controls = false

            m.player.callFunc("setMaxVideoResolution", 1920, 1080)
            setupPlayerPosition()
            setSource()
            m.top.setFocus(true)
            m.player.callFunc("play")
        end function

        function setSource()
            sourceDescription = {
                "sources": [
                    {
                        "src": "http://cdn.theoplayer.com/video/star_wars_episode_vii-the_force_awakens_official_comic-con_2015_reel_(2015)/index.m3u8",
                        "type": "application/x-mpegURL"
                    }
                ]
            }
            m.player.source = sourceDescription
            m.player.source.Live = false
            m.player.source.LiveBoundsPauseBehavior = "pause"
        end function

        function setupPlayerPosition()
            uiRes = m.top.getScene().currentDesignResolution
            m.uiRes = uiRes
            playerRect = {
                width: 1600,
                height: 800,
                x: (m.uiRes.width - 1600) / 2,
                y: (m.uiRes.height - 800) / 2
            }
            m.player.callFunc("setDestinationRectangle", playerRect)
        end function

        ]]>

    </script>

    <children>
	    <THEOsdk:THEOplayer id="TestPlayer" controls="false"/>
    </children>
</component>
```

### Control bar Play, Pause, Stop buttons

To create a control bar with play, pause and stop buttons, generally we would need to create custom UI elements (buttons) and call the api methods when they are played. To accomplish that we have to take the following steps:

Let's start with creating the UI elements which are simply xml elements. We will add three buttons (play, pause and stop), along with timeline bar.

```xml
<Group id="playerOverlay">
	<Group id="GroupOptions">
		<Rectangle id="OptionsBackground" color="0x000000FF" height="47" width="10" opacity="0.5"/>
		<Rectangle id="TimelineBackground" height="3" width="0" opacity="0.3"/>
		<Rectangle id="TimelineProgress" height="3" width="0" color="0xFFC713FF"/>

		<ButtonGroup id="ButtonGroupOptions" layoutDirection="horiz">
			<Button id="ButtonPlay" iconUri="" focusBitmapUri="pkg:/images/focusBG.png" focusedIconUri="" maxWidth="115" minWidth="115" height="95" opacity="0.9" scale="[0.5,0.5]">
				<Poster width="75" height="65" id="playIcon" uri="pkg:/images/play.png" translation="[20,15]" opacity="0.9"/>
			</Button>
			<Button id="ButtonPause" iconUri="" focusBitmapUri="pkg:/images/focusBG.png" focusedIconUri="" maxWidth="115" minWidth="115" height="95" opacity="0.9" scale="[0.5,0.5]">
				<Poster width="75" height="65" id="pauseIcon" uri="pkg:/images/pause.png" translation="[20,15]" opacity="0.9"/>
			</Button>
			<Button id="ButtonStop" iconUri="" focusBitmapUri="pkg:/images/focusBG.png" focusedIconUri="" maxWidth="115" minWidth="115" height="95" opacity="0.9" scale="[0.5,0.5]">
				<Poster id="stopIcon" uri="pkg:/images/stop.png" width="75" height="65" translation="[20,15]" opacity="0.9"/>
			</Button>
		</ButtonGroup>
	</Group>
</Group>
```

Next step would be adding callback on buttons press. To do so, we will use [roku native observe mechanism](https://developer.roku.com/en-gb/docs/developer-program/core-concepts/handling-application-events.md#handling-node-field-value-changes).

```brightscript
function Init()
	m.player = m.top.findNode("TestPlayer")
	m.player.configuration = {
      "license": "" ' put the THEOplayer license between apostrophes
    }
	m.buttonPlay = m.top.findNode("ButtonPlay")
	m.buttonPause = m.top.findNode("ButtonPause")
	m.buttonStop = m.top.findNode("ButtonStop")

	setupPlayerPosition()
	setupControlsPosition()
	setSource()

	m.buttonPlay.setFocus(true)

	m.buttonPlay.observeField("buttonSelected", "OnEventPlay")
	m.buttonPause.observeField("buttonSelected", "OnEventPause")
	m.buttonStop.observeField("buttonSelected", "OnEventStop")

end function

function OnEventPlay()

end function

function OnEventPause()

end function

function OnEventStop()

end function
```

The next step would be calling the THEOplayer api methods inside our callback. To do so, we will modify the callbacks:

```brightscript
function OnEventPlay()
	if m.player.source = Invalid
		setSource()
	end if
	m.player.callFunc("play")
end function

function OnEventPause()
	m.player.callFunc("pause")
end function

function OnEventStop()
	m.player.source = Invalid
end function
```

Last thing left to do is to make the timeline work. We will add an event listener to an event "timeUpdate". This listener will allow us to react to every time update, so we can draw the current progress in playing video.

```xml
<?xml version="1.0" encoding="utf-8" ?>
<component name="TestScene" extends="Scene">
    <interface>

        <function name="callbackOnEventPlayerTimeupdate"/>

    </interface>

    <script type = "text/brightscript" >

        <![CDATA[

        function Init()
            m.player = m.top.findNode("TestPlayer")
            m.player.configuration = {
              "license": "" ' put the THEOplayer license between apostrophes
            }
            m.buttonPlay = m.top.findNode("ButtonPlay")
            m.buttonPause = m.top.findNode("ButtonPause")
            m.buttonStop = m.top.findNode("ButtonStop")

            m.player.callFunc("setMaxVideoResolution", 1920, 1080)
            setupPlayerPosition()
            setupControlsPosition()

            setSource()
            m.buttonPlay.setFocus(true)

            m.buttonPlay.observeField("buttonSelected", "OnEventPlay")
            m.buttonPause.observeField("buttonSelected", "OnEventPause")
            m.buttonStop.observeField("buttonSelected", "OnEventStop")

            m.player.listener = m.top
            m.player.callFunc("addEventListener", m.player.Event.c, "callbackOnEventPlayerTimeupdate")
        end function

        function setSource()
            sourceDescription = {
                "sources": [
                    {
                        "src": "http://cdn.theoplayer.com/video/star_wars_episode_vii-the_force_awakens_official_comic-con_2015_reel_(2015)/index.m3u8",
                        "type": "hls"
                    }
                ]
            }
            m.player.source = sourceDescription
            m.player.source.Live = false
            m.player.source.LiveBoundsPauseBehavior = "pause"
        end function

        function setupPlayerPosition()
            uiRes = m.top.getScene().currentDesignResolution
            m.uiRes = uiRes
            playerRect = {
                width: 1600,
                height: 800,
                x: (m.uiRes.width - 1600) / 2,
                y: (m.uiRes.height - 800) / 2
            }
            m.player.callFunc("setDestinationRectangle", playerRect)
        end function

        function setupControlsPosition()
            buttons = [m.buttonPlay, m.buttonPause, m.buttonStop]
            buttonsWidth = 0

            for each button in buttons
                ' get rid of focus footprint on the buttons
                button.removeChildIndex(1)

                ' -20 because of buttons ovelaping and scale
                buttonsWidth += button.minWidth - 20
            end for

            uiRes = m.top.getScene().currentDesignResolution
            playerRect = m.player.boundingRect()
            playerBottomX = playerRect.width + playerRect.x
            playerBottomY = playerRect.height + playerRect.y
            m.groupOptions = m.top.findNode("GroupOptions")
            m.buttonGroupOptions = m.top.findNode("ButtonGroupOptions")
            m.groupOptionsVisible = true
            buttonGroupOptionsRect = m.buttonGroupOptions.boundingRect()
            centerY = playerRect.y + playerRect.height - buttonGroupOptionsRect.height
            centerX = playerRect.x
            m.groupOptions.translation = [centerX, centerY]
            centerX = (playerRect.width - buttonsWidth / 2) / 2
            m.buttonGroupOptions.translation = [centerX, 3]

            m.optionsBackground = m.top.findNode("OptionsBackground")
            m.optionsBackground.width = playerRect.width
            m.timelineBackground = m.top.findNode("TimelineBackground")
            m.timelineBackground.width = playerRect.width

            m.timelineProgress = m.top.findNode("TimelineProgress")
            m.timelineProgress.width = 1
        end function

        function callbackOnEventPlayerTimeupdate(eventData)
            'update movie timeline bar
            if m.player.duration > 0 and m.player.currentTime < m.player.duration
                rect = m.player.boundingRect()
                m.timelineProgress.width = rect.width * ( m.player.currentTime / m.player.duration )
            end if
        end function

        function OnEventPlay()
            if m.player.source = Invalid
                setSource()
            end if

            m.player.callFunc("play")
        end function

        function OnEventPause()
            m.player.callFunc("pause")
        end function

        function OnEventStop()
            m.player.source = Invalid
        end function

        ]]>

    </script>

    <children>
	    <THEOsdk:THEOplayer id="TestPlayer" controls="false"/>

        <Group id="playerOverlay">
            <Group id="GroupOptions">
                <Rectangle id="OptionsBackground" color="0x000000FF" height="47" width="10" opacity="0.5"/>
                <Rectangle id="TimelineBackground" height="3" width="0" opacity="0.3"/>
                <Rectangle id="TimelineProgress" height="3" width="0" color="0xFFC713FF"/>

                <ButtonGroup id="ButtonGroupOptions" layoutDirection="horiz">
                    <Button id="ButtonPlay" iconUri="" focusBitmapUri="pkg:/images/focusBG.png" focusedIconUri="" maxWidth="115" minWidth="115" height="95" opacity="0.9" scale="[0.5,0.5]">

                        <Poster width="75" height="65" id="playIcon" uri="pkg:/images/play.png" translation="[20,15]" opacity="0.9"/>
                    </Button>
                    <Button id="ButtonPause" iconUri="" focusBitmapUri="pkg:/images/focusBG.png" focusedIconUri="" maxWidth="115" minWidth="115" height="95" opacity="0.9" scale="[0.5,0.5]">

                        <Poster width="75" height="65" id="pauseIcon" uri="pkg:/images/pause.png" translation="[20,15]" opacity="0.9"/>
                    </Button>
                    <Button id="ButtonStop" iconUri="" focusBitmapUri="pkg:/images/focusBG.png" focusedIconUri="" maxWidth="115" minWidth="115" height="95" opacity="0.9" scale="[0.5,0.5]">

                        <Poster id="stopIcon" uri="pkg:/images/stop.png" width="75" height="65" translation="[20,15]" opacity="0.9"/>
                    </Button>
                </ButtonGroup>

            </Group>
        </Group>
    </children>
</component>
```

### Control bar Switch audio or text tracks

Now, let’s add an audio or text track management menu. In this portion, we will use a fresh SceneGraph component (RadioButtonList). We will use other callbacks, API methods and attributes. The main steps which we have to take to accomplish the desired outcome are:

Create an empty RadioButtonList component:

```xml
<RadioButtonList
    id="ButtonGroupCategoryFirst"
    opacity="1"
    focusBitmapUri="pkg:/images/focusBG.png"
    focusedColor="0xFFFFFFFF"
    color="0xFFFFFFFF"
    itemSize="[300,65]"
    translation="[0,65]">
</RadioButtonList>
```

Add the content to our list. To do so, we will observe audio tracks and assign the audio tracks list to a previously created radio button list.

```brightscript
function onEventAudioTracksChanged()
    list = createObject("roSGNode","ContentNode")
    option = list.createChild("ContentNode")
    option.title = "default"
    option.description = "default"
    option.id = ""
    checkedItem = 0
    index = 1
    for each track in m.player.audioTracks
        option = list.createChild("ContentNode")
        option.title = track.label
        option.description = track.language
        option.id = track.id
        if track.enabled then
            checkedItem = index
        end if
        index +=1
    end for

    optionsCount = 0
    if Type(m.buttonGroupCategorySecond.content) <> "roInvalid" then
        optionsCount = m.buttonGroupCategorySecond.content.count()
    end if
    if list.count() <> optionsCount then
        m.buttonGroupCategorySecond.content = list
        m.buttonGroupCategorySecond.checkedItem = checkedItem
        setAudioMenuPosition()
    end if
end function
```

The next step would be managing a focus of the remote.

```brightscript
function OnKeyEvent(key, press) as Boolean
    handled = false
    showOptions()
    if press
        if key = "options"
        else if m.player.visible = true and key = "back"
            ' Settings Menu opened
            if m.settingsOptions.visible = true
                hideSettings()
                handled = true
            ' category 1 Menu opened
            else if m.categoryFirstOptions.visible = true then
                hideCategoryFirst()
                handled = true
            ' category 2 Menu opened
            else if m.categorySecondOptions.visible = true then
                hideCategorySecond()
                handled = true
            else
                m.player.source = Invalid
            end if
        else if key = "up"
            if m.settingsOptions.visible = true and m.buttonCategoryFirst.hasFocus() = true
                hideSettings()
                handled = true
            ' category 1 Menu opened
            ' else if m.categoryFirstOptions.visible = true and m.buttonGroupCategoryFirst.hasFocus() = true then
            '     hideCategoryFirst()
            '     handled = true
            ' category 2 Menu opened
            else if m.categorySecondOptions.visible = true and m.categorySecondButtonFirst.hasFocus() = true then
                hideCategorySecond()
                handled = true
            end if
        end if
    end if

    return handled
end function
```

In order to allow the user to change audio tracks, we have to prepare a function which will change audio track.

```brightscript
function setAudioTrack(label as String)
    audioTracks =  m.player.audioTracks
    for i =  audioTracks.count() - 1 to 0 step -1
        if audioTracks[i].label = label then
            audioTracks[i].enabled = true
        else
            audioTracks[i].enabled = false
        end if
    end for
    'required because roku deep-copied roAssociativeArray through fields (pass-by-value)
    'read more : <https://developer.roku.com/en-gb/docs/developer-program/performance-guide/optimization-techniques.md#OptimizationTechniques-DataFlow>
    m.player.audioTracks = audioTracks
end function

function OnEventCategorySecondSelectedItem()
    if m.player.instance <> Invalid
        itemIndex = m.buttonGroupCategorySecond.checkedItem
        item = m.buttonGroupCategorySecond.content.getChild(itemIndex)
        setAudioTrack(item.title)
    end if
end function
```

To complete this functionality, we will add an observer to the radio button list and call the setAudioTrack function.

```brightscript
function OnEventCategoryFirstSelectedItem()
    if m.player.instance <> Invalid
        itemIndex = m.buttonGroupCategoryFirst.checkedItem
        item = m.buttonGroupCategoryFirst.content.getChild(itemIndex)
        setCaptionsLanguage(item.description)
    end if
end function
```

You can find the whole example below. This example contains two menus which allow users to manipulate audio and text tracks.

```xml
<?xml version="1.0" encoding="utf-8" ?>

<component name="TestScene" extends="Scene">

    <interface>

        <function name="callbackOnEventPlayerTimeupdate"/>

    </interface>

    <script type="text/brightscript">
        <![CDATA[

        function Init()
            SetupUI()
            SetupObservers()
            SetupEventListeners()
        end function

        function SetupUI()
            m.buttonPlay = m.top.findNode("ButtonPlay")
            m.buttonPause = m.top.findNode("ButtonPause")
            m.buttonStop = m.top.findNode("ButtonStop")
            m.buttonSettings = m.top.findNode("ButtonSettings")
            m.categoryFirstHeaderBackground = m.top.findNode("CategoryFirstHeaderBackground")
            m.settingsOptions = m.top.findNode("SettingsOptions")
            m.buttonCategoryFirst = m.top.findNode("ButtonCategoryFirst")
            m.buttonCategorySecond = m.top.findNode("ButtonCategorySecond")
            m.categoryFirstButtonFirst = m.top.findNode("CategoryFirstButtonFirst")
            m.categorySecondButtonFirst = m.top.findNode("CategorySecondButtonFirst")

            m.player = m.top.findNode("TestPlayer")
            m.player.configuration = {
              "license": "" ' put the THEOplayer license between apostrophes
            }
            SetupPlayerPosition()
            SetControlsPosition()

            setSource()
            m.buttonPlay.setFocus(true)
        end function

        function SetupObservers()
            m.player.observeField("audioTracks","onEventAudioTracksChanged")
            m.player.observeField("textTracks","onEventTextTracksChanged")

            m.buttonPlay.observeField("buttonSelected", "OnEventPlay")
            m.buttonPause.observeField("buttonSelected", "OnEventPause")
            m.buttonStop.observeField("buttonSelected", "OnEventStop")
            m.buttonSettings.observeField("buttonSelected", "OnEventSettings")

            m.buttonCategoryFirst.observeField("buttonSelected", "OnEventCategoryFirst")
            m.buttonGroupCategoryFirst.observeField("itemFocused", "OnEventCategoryFirstFocusedItem")
            m.buttonGroupCategoryFirst.observeField("checkedItem", "OnEventCategoryFirstSelectedItem")

            m.buttonCategorySecond.observeField("buttonSelected", "OnEventCategorySecond")
            m.buttonGroupCategorySecond.observeField("itemFocused", "OnEventCategorySecondFocusedItem")
            m.buttonGroupCategorySecond.observeField("checkedItem", "OnEventCategorySecondSelectedItem")
        end function

        function SetupEventListeners()
            m.player.listener = m.top
            m.player.callFunc("addEventListener", m.player.Event.timeupdate, "callbackOnEventPlayerTimeupdate")
        end function

        function SetupPlayerPosition()
            m.uiRes = m.top.getScene().currentDesignResolution
            m.timelineProgress = m.top.findNode("TimelineProgress")
            m.timelineProgress.width = 1
            'm.player.callFunc("setMaxVideoResolution", m.uiRes.width, m.uiRes.height)
            ' center video'
            'playerRect = {
            ''    width: m.uiRes.width,
            ''    height: m.uiRes.height,
            ''    x: 0,
            ''    y: 0
            ''}
            'm.player.callFunc("setDestinationRectangle", playerRect)
        end function

        function SetControlsPosition()
            buttons = [m.buttonPlay, m.buttonPause, m.buttonStop, m.buttonSettings]
            buttonsWidth = 0

            for each button in buttons
                ' get rid of focus footprint on the buttons
                button.removeChildIndex(1)

                ' -20 because of buttons ovelaping and scale
                buttonsWidth += button.minWidth - 20
            end for
            playerRect = m.player.boundingRect()
            playerBottomX = playerRect.width + playerRect.x
            playerBottomY = playerRect.height + playerRect.y
            m.groupOptions = m.top.findNode("GroupOptions")
            m.buttonGroupOptions = m.top.findNode("ButtonGroupOptions")
            m.groupOptionsVisible = true
            buttonGroupOptionsRect = m.buttonGroupOptions.boundingRect()
            centerY = playerRect.y + playerRect.height - buttonGroupOptionsRect.height
            centerX = playerRect.x
            m.groupOptions.translation = [centerX, centerY]
            centerX = (playerRect.width - buttonsWidth / 2) / 2
            m.buttonGroupOptions.translation = [centerX, 3]

            m.optionsBackground = m.top.findNode("OptionsBackground")
            m.optionsBackground.width = playerRect.width
            m.timelineBackground = m.top.findNode("TimelineBackground")
            m.timelineBackground.width = playerRect.width

            m.settingsOptions = m.top.findNode("SettingsOptions")
            m.buttonGroupSettings = m.top.findNode("ButtonGroupSettings")
            settingsRect = m.settingsOptions.boundingRect()
            buttonGroupSettingsRect = m.buttonGroupSettings.boundingRect()
            groupOptionsRect = m.groupOptions.boundingRect()
            centerX = playerBottomX - buttonGroupSettingsRect.x - settingsRect.width - 20
            centerY = playerBottomY - buttonGroupSettingsRect.y - settingsRect.height - 20
            m.settingsOptions.translation = [centerX, centerY ]


            m.categoryFirstOptions = m.top.findNode("CategoryFirstOptions")
            m.categoryFirstBackground = m.top.findNode("CategoryFirstBackground")
            m.buttonGroupCategoryFirst = m.top.findNode("ButtonGroupCategoryFirst")
            SetClosedCaptionsMenuPosition()

            m.categorySecondOptions = m.top.findNode("CategorySecondOptions")
            m.categorySecondBackground = m.top.findNode("CategorySecondBackground")
            m.buttonGroupCategorySecond = m.top.findNode("ButtonGroupCategorySecond")
            SetAudioMenuPosition()
        end function

        function SetClosedCaptionsMenuPosition()
            playerRect = m.player.boundingRect()
            playerBottomX = playerRect.width + playerRect.x
            playerBottomY = playerRect.height + playerRect.y
            categoryFirstRect = m.categoryFirstOptions.boundingRect()
            categoryFirstButtonGroupRect = m.buttonGroupCategoryFirst.boundingRect()
            centerX = playerBottomX - categoryFirstButtonGroupRect.x - categoryFirstRect.width - 20
            centerY = playerBottomY - categoryFirstButtonGroupRect.y - categoryFirstRect.height - m.categoryFirstHeaderBackground.height - 20
            m.categoryFirstOptions.translation = [centerX, centerY]
            m.categoryFirstBackground.height = categoryFirstRect.height + 30 ' added 30 because radio group shows separator
            if playerRect.x = 0 or playerRect.y = 0 or playerRect.width = m.uiRes.width or playerRect.height = m.uiRes.height then
                m.fullScreen = true
                if m.player.textTracks.count() > 0
                    m.buttonCategoryFirst.textColor = "0xFFFFFFFF"
                    m.buttonCategoryFirst.focusedTextColor = "0xFFFFFFFF"
                else
                    m.buttonCategoryFirst.textColor = "0x666666FF"
                    m.buttonCategoryFirst.focusedTextColor = "0x666666FF"
                end if
            else
                m.fullScreen = false
                m.buttonCategoryFirst.textColor = "0x666666FF"
                m.buttonCategoryFirst.focusedTextColor = "0x666666FF"
            end if
        end function

        function SetAudioMenuPosition()
            playerRect = m.player.boundingRect()
            playerBottomX = playerRect.width + playerRect.x
            playerBottomY = playerRect.height + playerRect.y
            categorySecondOptionsRect = m.categorySecondOptions.boundingRect()
            categorySecondButtonGroupRect = m.buttonGroupCategorySecond.boundingRect()
            centerX = playerBottomX - categorySecondButtonGroupRect.x - categorySecondOptionsRect.width - 20
            centerY = playerBottomY - categorySecondButtonGroupRect.y - categorySecondOptionsRect.height - 20
            m.categorySecondOptions.translation = [centerX, centerY]
            m.categorySecondBackground.height = categorySecondOptionsRect.height
            isNode = Type(m.buttonGroupCategorySecond.content) = "roSGNode"
            if isNode then
                m.buttonCategorySecond.textColor = "0xFFFFFFFF"
                m.buttonCategorySecond.focusedTextColor = "0xFFFFFFFF"
            else
                m.buttonCategorySecond.textColor = "0x666666FF"
                m.buttonCategorySecond.focusedTextColor = "0x666666FF"
            end if
        end function

        function callbackOnEventPlayerTimeupdate(eventData)
            ? "Event <timeupdate>: "; eventData

            'update movie timeline bar
            if m.player.duration > 0 and m.player.currentTime < m.player.duration
                rect = m.player.boundingRect()
                m.timelineProgress.width = rect.width * ( m.player.currentTime / m.player.duration )
            end if
        end function

        function setSource()
            sourceDescription = {
                "poster": ""
                "sources": [
                    {
                        "src": "http://cdn.theoplayer.com/video/elephants-dream/playlist.m3u8",
                        "type": "application/x-mpegURL"
                    }
                ]
            }
            m.player.source = sourceDescription
            m.player.source.Live = m.live
            m.player.source.LiveBoundsPauseBehavior = "pause"
        end function

        function OnEventPlay()
            if m.player.source = Invalid
                setSource()
            end if

            m.player.callFunc("play")
        end function

        function hideOptions()
            if m.groupOptionsVisible = true
                m.groupOptionsVisible = false
                hideCategoryFirst()
                hideCategorySecond()
                hideSettings()
            end if
        end function

        function showOptions()
            if m.groupOptionsVisible = false
                m.groupOptionsVisible = true
            end if
        end function

        function showCategoryFirst()
            hideSettings()
            m.categoryFirstOptions.visible = true
            m.buttonGroupCategoryFirst.setFocus(true)
        end function

        function hideCategoryFirst()
            if  m.categoryFirstOptions.visible = true
                m.categoryFirstOptions.visible = false
                showSettings()
            end if
        end function

        function showCategorySecond()
            hideSettings()
            m.categoryFirstOptions.visible = true
            m.categorySecondButtonFirst.setFocus(true)
        end function

        function hideCategorySecond()
            if m.categorySecondOptions.visible = true
                m.categorySecondOptions.visible = false
                showSettings()
            end if
        end function

        function showSettings()
            m.settingsOptions.visible = true
            m.buttonCategoryFirst.setFocus(true)
        end function

        function hideSettings()
            if m.settingsOptions.visible = true
                m.settingsOptions.visible = false
                m.buttonSettings.setFocus(true)
            end if
        end function

        function OnEventPause()
            m.player.callFunc("pause")
        end function

        function OnEventStop()
            m.player.source = Invalid
        end function

        function OnEventCategoryFirst()
            isNode = Type(m.buttonGroupCategoryFirst.content) = "roSGNode"
            if isNode and m.fullScreen
                m.settingsOptions.visible = false
                m.categoryFirstOptions.visible = true
                m.buttonGroupCategoryFirst.setFocus(true)
            end if
        end function

        function OnEventCategorySecond()
            isNode = Type(m.buttonGroupCategorySecond.content) = "roSGNode"
            if isNode
                m.settingsOptions.visible = false
                m.categorySecondOptions.visible = true
                m.buttonGroupCategorySecond.setFocus(true)
            end if
        end function

        function onEventAudioTracksChanged()
            list = createObject("roSGNode","ContentNode")
            option = list.createChild("ContentNode")
            option.title = "default"
            option.description = "default"
            option.id = ""
            checkedItem = 0
            index = 1
            for each track in m.player.audioTracks
                option = list.createChild("ContentNode")
                option.title = track.label
                option.description = track.language
                option.id = track.id
                if track.enabled then
                    checkedItem = index
                end if
                index +=1
            end for

            optionsCount = 0
            if Type(m.buttonGroupCategorySecond.content) <> "roInvalid" then
                optionsCount = m.buttonGroupCategorySecond.content.count()
            end if
            if list.count() <> optionsCount then
                m.buttonGroupCategorySecond.content = list
                m.buttonGroupCategorySecond.checkedItem = checkedItem
                setAudioMenuPosition()
            end if
        end function

        function onEventTextTracksChanged()
            list = createObject("roSGNode","ContentNode")
            option = list.createChild("ContentNode")
            option.title = "default"
            option.description = "default"
            option.id = ""
            checkedItem = 0
            index = 1
            for each track in m.player.textTracks
                if track.kind = "captions"
                    option = list.createChild("ContentNode")
                    option.title = track.label
                    option.description = track.language
                    option.id = track.id
                    if track.mode = "showing" then
                        checkedItem = index
                    end if
                    index +=1
                end if
            end for

            optionsCount = 0
            if Type(m.buttonGroupCategoryFirst.content) <> "roInvalid" then
                optionsCount = m.buttonGroupCategoryFirst.content.count()
            end if
            if list.count() <> optionsCount then
                m.buttonGroupCategoryFirst.content = list
                m.buttonGroupCategoryFirst.checkedItem = checkedItem
                setClosedCaptionsMenuPosition()
            end if
        end function

        function OnEventSettings()
            if m.settingsOptions.visible = false
                m.settingsOptions.visible = true
                m.buttonCategoryFirst.setFocus(true)
            else
                m.settingsOptions.visible = false
            end if
        end function

        function OnEventCategoryFirstFocusedItem()
            showOptions()
        end function

        function setCaptionsLanguage(language as String)
            textTracks =  m.player.textTracks
            for i =  textTracks.count() - 1 to 0 step -1
                if textTracks[i].kind = "captions" and textTracks[i].language = language then
                    if m.fullScreen then
                        textTracks[i].mode = "showing"
                    else
                        textTracks[i].mode = "hidden"
                    end if
                else
                    textTracks[i].mode = "disabled"
                end if
            end for
            'assigment of new roAssociativeArray is required because roku deep-copied roAssociativeArray through fields (pass-by-value)
            'read more : <https://developer.roku.com/en-gb/docs/developer-program/performance-guide/optimization-techniques.md#OptimizationTechniques-DataFlow>
            m.player.textTracks = textTracks
        end function

        function OnEventCategoryFirstSelectedItem()
            if m.player.instance <> Invalid
                itemIndex = m.buttonGroupCategoryFirst.checkedItem
                item = m.buttonGroupCategoryFirst.content.getChild(itemIndex)
                setCaptionsLanguage(item.description)
            end if
        end function

        function OnEventCategorySecondFocusedItem()
            showOptions()
        end function

        function setAudioTrack(label as String)
            audioTracks =  m.player.audioTracks
            for i =  audioTracks.count() - 1 to 0 step -1
                if audioTracks[i].label = label then
                    audioTracks[i].enabled = true
                else
                    audioTracks[i].enabled = false
                end if
            end for
            'required because roku deep-copied roAssociativeArray through fields (pass-by-value)
            'read more : <https://developer.roku.com/en-gb/docs/developer-program/performance-guide/optimization-techniques.md#OptimizationTechniques-DataFlow>
            m.player.audioTracks = audioTracks
        end function

        function OnEventCategorySecondSelectedItem()
            if m.player.instance <> Invalid
                itemIndex = m.buttonGroupCategorySecond.checkedItem
                item = m.buttonGroupCategorySecond.content.getChild(itemIndex)
                setAudioTrack(item.title)
            end if
        end function

        function OnKeyEvent(key, press) as Boolean
            handled = false
            showOptions()
            if press
                if key = "options"
                else if m.player.visible = true and key = "back"
                    ' Settings Menu opened
                    if m.settingsOptions.visible = true
                        hideSettings()
                        handled = true
                    ' category 1 Menu opened
                    else if m.categoryFirstOptions.visible = true then
                        hideCategoryFirst()
                        handled = true
                    ' category 2 Menu opened
                    else if m.categorySecondOptions.visible = true then
                        hideCategorySecond()
                        handled = true
                    else
                        m.player.source = Invalid
                    end if
                else if key = "up"
                    if m.settingsOptions.visible = true and m.buttonCategoryFirst.hasFocus() = true
                        hideSettings()
                        handled = true
                    ' category 1 Menu opened
                    ' else if m.categoryFirstOptions.visible = true and m.buttonGroupCategoryFirst.hasFocus() = true then
                    '     hideCategoryFirst()
                    '     handled = true
                    ' category 2 Menu opened
                    else if m.categorySecondOptions.visible = true and m.categorySecondButtonFirst.hasFocus() = true then
                        hideCategorySecond()
                        handled = true
                    end if
                end if
            end if

            return handled
        end function

        ]]>
    </script>
    <children>
	    <THEOsdk:THEOplayer id="TestPlayer" controls="false"/>

        <Group id="playerOverlay">
            <Group id="GroupOptions">
                <Rectangle id="OptionsBackground" color="0x000000FF" height="47" width="10" opacity="0.5"/>
                <Rectangle id="TimelineBackground" height="3" width="0" opacity="0.3"/>
                <Rectangle id="TimelineProgress" height="3" width="0" color="0xFFC713FF"/>

                <ButtonGroup id="ButtonGroupOptions" layoutDirection="horiz">
                    <Button id="ButtonPlay" iconUri="" focusBitmapUri="pkg:/images/focusBG.png" focusedIconUri="" maxWidth="115" minWidth="115" height="95" opacity="0.9" scale="[0.5,0.5]">
                        <Poster width="75" height="65" id="playIcon" uri="pkg:/images/play.png" translation="[20,15]" opacity="0.9"/>
                    </Button>
                    <Button id="ButtonPause" iconUri="" focusBitmapUri="pkg:/images/focusBG.png" focusedIconUri="" maxWidth="115" minWidth="115" height="95" opacity="0.9" scale="[0.5,0.5]">
                        <Poster width="75" height="65" id="pauseIcon" uri="pkg:/images/pause.png" translation="[20,15]" opacity="0.9"/>
                    </Button>
                    <Button id="ButtonStop" iconUri="" focusBitmapUri="pkg:/images/focusBG.png" focusedIconUri="" maxWidth="115" minWidth="115" height="95" opacity="0.9" scale="[0.5,0.5]">
                        <Poster id="stopIcon" uri="pkg:/images/stop.png" width="75" height="65" translation="[20,15]" opacity="0.9"/>
                    </Button>
                    <Button id="ButtonSettings" iconUri="" focusBitmapUri="pkg:/images/focusBG.png" focusedIconUri="" maxWidth="115" minWidth="115" height="95" opacity="0.9" scale="[0.5,0.5]">
                        <Poster id="settingsIcon" uri="pkg:/images/settings.png" width="75" height="65" translation="[20,15]" opacity="0.9"/>
                    </Button>
                </ButtonGroup>

            </Group>

            <Group id="SettingsOptions" visible="false">
                <Rectangle id="SettingsBackground" color="0x000000FF" width="500" height="215" translation="[-15,0]" opacity="0.5"/>
                <Rectangle id="SettingsHeaderBackground" color="0xFFC713FF" width="500" height="65" translation="[-15,0]">
                    <Label text="Settings" height="65" width="470" horizAlign="center" vertAlign="center" font="font:SmallestBoldSystemFont"/>
                </Rectangle>

                <ButtonGroup id="ButtonGroupSettings" layoutDirection="vert" vertAlignment="top" translation="[0,65]" opacity="1">
                    <Button
                        id="ButtonCategoryFirst"
                        iconUri=""
                        focusedIconUri=""
                        focusBitmapUri="pkg:/images/focusBG.png"
                        maxWidth="470"
                        minWidth="470"
                        height="65"
                        opacity="0.9"
                        text="Captions"
                        focusedTextColor="0xFFFFFFFF"
                        textFont="font:SmallestBoldSystemFont"
                        focusedTextFont="font:SmallestBoldSystemFont"></Button>
                    <Button
                        id="ButtonCategorySecond"
                        iconUri=""
                        focusedIconUri=""
                        focusBitmapUri="pkg:/images/focusBG.png"
                        maxWidth="470"
                        minWidth="470"
                        height="65"
                        opacity="0.9"
                        text="Audio Tracks"
                        focusedTextColor="0xFFFFFFFF"
                        textFont="font:SmallestBoldSystemFont"
                        focusedTextFont="font:SmallestBoldSystemFont"></Button>
                </ButtonGroup>
            </Group>

            <Group id="CategoryFirstOptions" visible="false">
                <Rectangle id="CategoryFirstBackground" color="0x000000FF" width="300" height="0" opacity="0.5"/>
                <Rectangle id="CategoryFirstHeaderBackground" color="0xFFC713FF" width="300" height="65">
                    <Label text="Captions" height="65" width="300" horizAlign="center" vertAlign="center" font="font:SmallestBoldSystemFont"/>
                </Rectangle>

                <RadioButtonList
                    id="ButtonGroupCategoryFirst"
                    opacity="1"
                    focusBitmapUri="pkg:/images/focusBG.png"
                    focusedColor="0xFFFFFFFF"
                    color="0xFFFFFFFF"
                    itemSize="[300,65]"
                    translation="[0,65]">
                </RadioButtonList>
            </Group>
            <Group id="CategorySecondOptions" visible="false">
                <Rectangle id="CategorySecondBackground" color="0x000000FF" width="300" height="0" opacity="0.5"/>
                <Rectangle id="CategorySecondHeaderBackground" color="0xFFC713FF" width="300" height="65">
                    <Label text="Audio Tracks" height="65" width="300" vertAlign="center" horizAlign="center" font="font:SmallestBoldSystemFont"/>
                </Rectangle>

                <RadioButtonList
                    id="ButtonGroupCategorySecond"
                    opacity="1"
                    focusBitmapUri="pkg:/images/focusBG.png"
                    focusedColor="0xFFFFFFFF"
                    color="0xFFFFFFFF"
                    itemSize="[300,65]"
                    translation="[0,65]">
                </RadioButtonList>
            </Group>
        </Group>
    </children>
</component>
```
