Frame Metadata
In addition to streaming audio and video there are many use cases that require additional metadata about what is happening in the stream. We refer to this as Frame Metadata which allows for embedding and extraction of custom application data that has frame-level accuracy.
This can be useful for transporting temporal data such as:
- timecodes
- bounding boxes
- visual and text overlays
- interactive video applications
- gps coordinates
These cue points are often used for time synchronizing application state with the action happening in the video player.
SEI Metadata
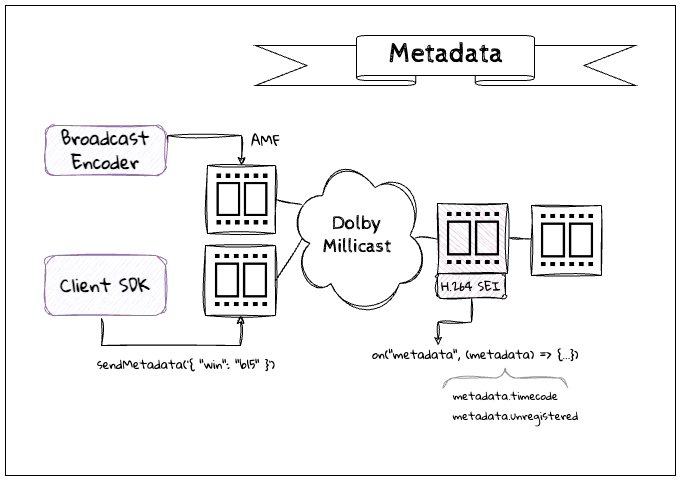
Millicast has standardized metadata access in the Supplemental Enhancement Information (SEI) which is available for codecs like H.264 (AVC). It can be inserted directly by using our Client SDKs as well as some broadcast encoders that embed Action Message Format (AMF) messages.
Message Delivery
Metadata is encoded into the frame at broadcast and then extracted by the Client SDK at playback time.
- There is a timecode that will be supplied by the broadcaster and carried through the platform and available at playback. (See Timecode Metadata)
- Application supplied metadata is incorporated as unregistered SEI messages. These are received as
Bytearrays if unable to be converted into JSON objects. - It is recommended to limit the amount of data that is packaged with the frame as this increases the size of each frame for distribution (impacting latency and bandwidth costs).
- There may be marginal overhead in encoding and decoding messages, so you must enable metadata when establishing a connection if you want to send or receive.
With WebRTC and a UDP connection, latency is prioritized over reliable delivery so the metadata is not guaranteed to always be received and could be lost with any dropped frames making it less suitable for critical notifications. For durable messages or guaranteed delivery you can use third-party peer-to-peer messaging services and synchronize with the client using the timecode from SEI and avoid skipping metadata messages.
Metadata Source Identification
When receiving metadata there is a uuid attribute that can be used to uniquely identify the source of the metadata in cases of multiple publishing sources. The table includes a few examples:
| UUID | Description |
|---|---|
| 9a21f3be-31f0-4b78-b0be-c7f7dbb97250 | SEI metadata inserted from AMF OnFi message feeds. |
| d40e38ea-d419-4c62-94ed-20ac37b4e4fa | SEI metadata inserted by the Web SDK. |
For PIC_TIMING SEI messages that are inserted by various encoders, there will not be a UUID assigned and included with the frame.
SEI Preservation
SEI that is already embedded in the source H.264 bitstream — such as arbitrary user-data SEI, pic_timing, or any other SEI the source encoder baked into the elementary stream — is preserved differently depending on how the stream is processed:
- Passthrough layer: SEI will remain available in the output stream, including ABR publishing.
- Cloud Transcoder: Existing SEI from the source bitstream is not preserved in the transcoded output.
Timecode Metadata
There are several ways to send and receive timecode into the service which can be extracted in the player.
- Embed pic_timing (part of SEI metadata) in the
h264video stream (this is automatically inserted with some encoders) - Send RTMP with onFi (part of OnMetaData in AMF metadata). The service will read this value from the RTMP stream and insert it into the SEI metadata of the timecode (See Metadata Source Identification). This works with both standard publishing and publishing through a cloud transcoder, including the passthrough layers of a cloud transcoder output.
Here is an example of a frame's metadata that has pic_timing from the SEI in the metadata callback:
{
  "seiPicTimingTimeCodeArray": [
    {
      "n_frames": 20,
      "seconds_value": 57,
      "minutes_value": 51,
      "hours_value": 19,
      "time_offset": 0
    }
  ],
  "mid": "0",
  "track": {}
}
If you have metadata from onFi, here is what that metadata will look like (note the UUID indicating the source from onFi):
{
  "uuid": "9a21f3be-31f0-4b78-b0be-c7f7dbb97250",
  "timecode": "2026-02-11T19:49:16.299Z",
  "seiPicTimingTimeCodeArray": [
    {
      "n_frames": 9,
      "seconds_value": 16,
      "minutes_value": 49,
      "hours_value": 19,
      "time_offset": 0
    }
  ],
  "mid": "0",
  "track": {}
}
Here is an example of consuming this metadata in JavaScript:
millicastView.on('metadata', (metadata) => {
  updateMetadataDisplay(metadata);
  processTimecodeDisplay(metadata);
});
Server-Inserted UTC Timecode
Some contribution encoders do not embed a timecode (they send neither pic_timing SEI nor onFi/AMF metadata). For these streams you can have the platform stamp each H.264 frame with the server's UTC receive time by enabling the enableUTCInsertion parameter (available as a URL parameter, a publishing-token setting, and an account-level default).
When enabled, the server inserts an unregistered SEI message carrying the receive time as Unix epoch milliseconds. It reuses the same UUID as onFi (9a21f3be-31f0-4b78-b0be-c7f7dbb97250), so players receive and parse it exactly like an onFi timecode — the metadata callback delivers the same uuid and timecode fields shown in the onFi example above. No player-side changes are required.
This is supported for RTMP and SRT H.264 ingest only — it does not apply to WebRTC (WHIP) ingest passthrough, and it does not apply to H.265.
The platform only inserts a UTC timestamp on frames that do not already carry a sender time. An existing onFi/AMF timestamp is never overwritten.
When more than one method is used to configure the enableUTCInsertion flag, the URL parameter takes precedence over the publishing-token setting, which in turn overrides the account-level default.
It is generally recommended to configure the flag at the publishing-token or account level rather than via the URL parameter. This keeps the setting controllable and visible through the dashboard. The URL parameter is best reserved for quick testing, not for permanent ingest configurations.
Enable this only on streams that do not already carry onFi/AMF metadata. If an encoder supplies a sender time on only some frames, the delivered timecode will alternate between the encoder clock and the server clock.
Behavior across processing modes
enableUTCInsertion is supported for all three ways an H.264 stream can be processed. In every case the timestamp is a fresh, per-frame value (the server receive time of that frame), not a single value frozen at the keyframe.
- Passthrough (no transcoding): the SEI is inserted into the passthrough output. It honors
seiKeyFrameOnly— by default (false) it is inserted on every frame; whenseiKeyFrameOnlyis set it is inserted on keyframes only. - Transcoding enabled: each transcoded output layer carries the SEI, inserted on every frame (this is independent of
seiKeyFrameOnly). Note that although source SEI is otherwise not preserved through the transcoder, this UTC timecode is inserted by the platform into each transcoded layer, so it is present on transcoded output. - Transcoding enabled with a passthrough layer: a mix of the two above — the passthrough layer follows the
seiKeyFrameOnlyrule from case 1, while the transcoded layers carry the SEI on every frame as in case 2. All layers share the same source receive time.
| Processing mode | Default (seiKeyFrameOnly=false) | seiKeyFrameOnly=true |
|---|---|---|
| Passthrough layer | Every frame | Keyframes only |
| Transcoded layer | Every frame | Every frame (setting does not apply) |
Enabling UTC insertion
There are three ways to turn on enableUTCInsertion. When more than one applies, the URL parameter takes precedence over the publishing-token setting, which in turn overrides the account-level default:
- Per broadcast (URL parameter) — append it to the publish URL as described in Publishing Parameters. Applies to a single ingest connection.
- Per publishing token (Token API) — set it when you create or update a publish token. Applies to every stream published with that token.
- Account-wide default (dashboard) — a single toggle under Settings → Broadcast that sets the default for every token on the account.
Set it on a publishing token with the Token API
If you create and manage tokens manually, you can also set this per-token value directly in the dashboard — open the token's details and use the Insert UTC timestamp control (Default / On / Off), which maps to the same tri-state described below.
On a publish token enableUTCInsertion is a tri-state boolean, so an individual token can override the account-level default:
| Value | Behavior |
|---|---|
true | Always insert the UTC timestamp for streams published with this token. |
false | Never insert it — even when the account-level default is on. |
null | Inherit the account-level default. This is the behavior when the field is omitted. |
See the Token API guide for how to acquire an API Secret. Create a publish token with UTC insertion enabled:
curl --request POST \
     --url https://api.millicast.com/api/publish_token \
     --header 'accept: application/json' \
     --header 'authorization: Bearer YOUR_API_SECRET' \
     --header 'content-type: application/json' \
     --data '
{
  "streams": [
    {
      "streamName": "MainCam",
      "isRegex": false
    }
  ],
  "label": "UtcToken",
  "enableUTCInsertion": true
}
'
Update an existing token — set an explicit true/false, or send null to fall back to the account default:
curl --request PUT \
     --url https://api.millicast.com/api/publish_token/YOUR_TOKEN_ID \
     --header 'accept: application/json' \
     --header 'authorization: Bearer YOUR_API_SECRET' \
     --header 'content-type: application/json' \
     --data '
{
  "enableUTCInsertion": null
}
'
Set the account-wide default in the dashboard
To change the default for every publish token on the account, open the OptiView Real-time Streaming dashboard, go to Settings → Broadcast, and toggle Insert UTC timestamp. When it is on, every publish token on the account inserts the UTC timestamp by default; an individual token can still override this with an explicit true or false (see the table above).
Web SDK
When using the Web SDK to set and get frame metadata, you must include the metadata option to the connect() method on both Publish and View connections..
How-to Publish Frame Metadata
To send metadata use the sendMetadata() method which is expecting a string as the parameter.
const broadcastOptions = {
  codec: 'h264',
  metadata: true,
};

await publisher.connect(broadcastOptions);

publisher.sendMetadata('{"score": "4-3"}');
How-to View Frame Metadata
A separate metadata event is received for each frame when it is decoded so that the application can decide how to handle the metadata.
const playbackOptions = {
  codec: 'h264',
  metadata: true,
};

await millicastView.connect(playbackOptions);

millicastView.on('metadata', (metadata) => {
  console.log(`Timecode: ${metadata.timecode}`);
  console.log(`Unregistered: ${metadata.unregistered}`);
});
The metadata that was published with the Web SDK is found in the unregistered attribute. It is common to serialize and deserialize more complex data packages like JSON but is a decision left to the application.
Codec Support
If you are using a codec for your broadcasts such as AV1 or VP8 you can use an alternative method of frame metadata described below.
It is important to correctly encode and decode frames or you may experience negative impacts on stream performance.
With the method demonstrated here for non-SEI codec support:
- The data is transported as raw bytes so it can be implemented as any arbitrary format (ie. string, XML, JSON, etc...).
- The amount of data you can publish is not limited, but it increases the bandwidth and latency requirements so publishing small payloads is recommended.
- If you add extra bits to the encoded video stream, you must remove them on the viewer side for the video decoder to understand the stream and be able to display it on the screen.
Supporting Non-SEI Metadata for Web
Utilizing a TransformStream object, you can spin up a Web Worker to leverage background threads from the web browser and process individual video frames.
The following code uses two different routes to trigger the web worker, so it has cross-browser support. Edge and Chrome are using createEncodedStreams() while Safari and Firefox use RTCRtpScriptTransform.
Publishing metadata
Start by creating a new JavaScript file for the web worker called workerSender.js with the following code. This code of the TransformStream is responsible for inserting the metadata into each video frame.
const transformer = new TransformStream({
  async transform(frame, controller) {
    // Data should start with four bytes to signal the upcoming metadata at end of frame
    const magic_value = [0xca, 0xfe, 0xba, 0xbe];

    const data = [...magic_value, ...[...metadata].map((c) => c.charCodeAt(0)), 0, 0, 0, metadata.length];

    // Create DataView from Array buffer
    const frame_length = frame.data.byteLength;
    const buffer = new ArrayBuffer(frame_length + data.length);
    const view_buffer = new DataView(buffer);
    const view_frame = new DataView(frame.data);

    // Copy old frame buffer to new frame buffer and then append the metadata
    // at the end of the buffer
    for (let i = 0; i < frame_length; ++i) {
      view_buffer.setUint8(i, view_frame.getUint8(i));
    }

    data.forEach((elt, idx) => view_buffer.setUint8(frame_length + idx, elt));

    // Set the new frame buffer
    frame.data = buffer;

    // Send the frame
    controller.enqueue(frame);
  },
});
The metadata is passed using the postMessage() function. This is the code that will initialize the web worker and process the messages coming from the main thread to update the metadata. Insert this code in the same file as the TransformStream.
// Initialization of the Web Worker by RTCRtpScriptTransform
addEventListener('rtctransform', (event) => initialize(event.transformer));

// Metadata to send can be any arbitrary data or a string
var metadata = '';

// Event triggered when the main thread sends a message to the web worker
addEventListener('message', (event) => {
  const { action } = event.data;

  switch (action) {
    // Initialization of the Web Worker by Insertable Frames
    case 'init':
      initialize(event.data);
      break;
    // Update the metadata to add to the frames
    case 'metadata':
      metadata = event.data.metadata;
      break;
    default:
      break;
  }
});

// Insert the TransformStream into the video pipeline
function initialize({ readable, writable }) {
  readable.pipeThrough(transformer).pipeTo(writable);
}
Create another JavaScript file called scripts.js that will be used to publish a stream to the OptiView Real-time Streaming and start the web worker to insert the metadata. First, in order to know what capabilities the web browser supports (insertable frames or WebRTC Script Transform), add the following logic to your file.
// Insertable streams for `MediaStreamTrack` is supported.
const supportsInsertableStreams =
  window.RTCRtpSender && !!RTCRtpSender.prototype.createEncodedStreams && window.RTCRtpReceiver && !!RTCRtpReceiver.prototype.createEncodedStreams;

// WebRTC RTP Script Transform is supported
const supportsRTCRtpScriptTransform = 'RTCRtpScriptTransform' in window;
Copy the following function to start publishing a stream, add a video element with the local camera feed and start the web worker to insert he metadata.
var workerSender;

async function startPublishing(publishToken, streamName, participantName) {
  const tokenGenerator = () =>
    millicast.Director.getPublisher({
      token: publishToken,
      streamName: streamName,
    });

  const millicastPublish = new millicast.Publish(streamName, tokenGenerator);

  const mediaStream = await navigator.mediaDevices.getUserMedia({
    audio: true,
    video: true,
  });

  // Start publishing to RTS
  await millicastPublish.connect({
    mediaStream: mediaStream,
    sourceId: participantName,
    peerConfig: {
      // Indicate you want to use Insertable Streams
      encodedInsertableStreams: true,
    },
  });

  // Create a video element
  const videoElement = document.createElement('video');
  document.body.appendChild(videoElement);
  videoElement.muted = true;
  videoElement.autoplay = true;
  videoElement.controls = false;
  videoElement.srcObject = mediaStream;
  videoElement.play();

  workerSender = new Worker('workerSender.js');

  const senders = millicastPublish
    .getRTCPeerConnection()
    .getSenders()
    .filter((elt) => elt.track.kind === 'video');
  const sender = senders[0];

  if (supportsRTCRtpScriptTransform) {
    // Initialize the WebRTC RTP Script Transform
    sender.transform = new RTCRtpScriptTransform(workerSender, {});
  } else if (supportsInsertableStreams) {
    const { readable, writable } = sender.createEncodedStreams();

    // Initialize the web worker with the stream
    workerSender.postMessage(
      {
        action: 'init',
        readable,
        writable,
      },
      [readable, writable]
    );
  }
}
Now to inform the web worker about sending a new metadata with the frames, create the following function:
function sendMetadata(message) {
  if (workerSender) {
    console.log(`Send metadata: ${message}`);
    workerSender.postMessage({
      action: 'metadata',
      metadata: message,
    });
  }
}
To start publishing a stream, call the function **startPublishing() and to update the metadata, call the function **sendMetadata():
await startPublishing(publishToken, streamName, participantName);

sendMetadata('{"position": {"x": 100, "y": 200}}');
Viewing metadata
In a similar way, create a JavaScript file called workerReceiver.js for the web worker that hosts the logic of the TransformStream that extract the metadata from the video frames.
var oldMetadata = '';

const transformer = new TransformStream({
  async transform(frame, controller) {
    // Convert data from ArrayBuffer to Uint8Array
    const frame_data = new Uint8Array(frame.data);
    const total_length = frame_data.length;

    // Shift to left for endianness to retrieve the metadata size from the last
    // 4 bytes of the buffer
    let shift = 3;
    const size = frame_data.slice(total_length - 4).reduce((acc, v) => acc + (v << shift--), 0);

    // Use the byte signal identifying that the remaining data is frame metadata and
    // confirm that the signal is in the frame.
    const magic_bytes = frame_data.slice(total_length - size - 2 * 4, total_length - size - 4);

    // Data should start with four bytes to signal the upcoming metadata at end of frame
    const magic_value = [0xca, 0xfe, 0xba, 0xbe];

    const has_magic_value = magic_value.every((v, index) => v === magic_bytes[index]);

    // When there is metadata in the frame, get the metadata array and handle it
    // as needed by your application.
    if (has_magic_value) {
      const data = frame_data.slice(total_length - size - 4, total_length - 4);
      const newMetadata = String.fromCharCode(...data);
      if (oldMetadata !== newMetadata) {
        oldMetadata = newMetadata;
        // Send a message to the main thread with the new metadata
        self.postMessage(newMetadata);
      }
    }

    // Send the frame as is which is supported by video players
    controller.enqueue(frame);
  },
});
Insert the code to initialize the web worker in the same file as your TransformStream.
// Initialization of the Web Worker by RTCRtpScriptTransform
addEventListener('rtctransform', (event) => initialize(event.transformer));

// Initialization of the Web Worker by Insertable Frames
addEventListener('message', (event) => initialize(event.data));

// Insert the TransformStream into the video pipeline
function initialize({ readable, writable }) {
  readable.pipeThrough(transformer).pipeTo(writable);
}
Now in the scripts.js file, add the following code to connect and listen to a stream. When a new video track is added, the code will trigger a new web worker to extract the metadata from the video frame.
async function onTrack(event) {
  if (event.track.kind === 'video') {
    const worker = new Worker('workerReceiver.js');

    if (supportsRTCRtpScriptTransform) {
      // Initialize the WebRTC RTP Script Transform
      event.receiver.transform = new RTCRtpScriptTransform(worker, {});
    } else if (supportsInsertableStreams) {
      const { readable, writable } = event.receiver.createEncodedStreams();

      // Initialize the web worker with the stream
      worker.postMessage(
        {
          readable,
          writable,
        },
        [readable, writable]
      );
    }

    // Listen to messages sent by the web worker
    // Each message is a new metadata string
    worker.addEventListener('message', (evt) => {
      const mEvent = new CustomEvent('metadata', { detail: evt.data });
      window.dispatchEvent(mEvent);
    });

    const videoElement = document.createElement('video');
    document.body.appendChild(videoElement);
    videoElement.srcObject = new MediaStream([event.track]);
    videoElement.play();
  }
}

async function startListening(streamAccountId, streamName) {
  const tokenGenerator = () =>
    millicast.Director.getSubscriber({
      streamName: streamName,
      streamAccountId: streamAccountId,
    });

  const viewer = new millicast.View(streamName, tokenGenerator);
  viewer.on('track', (event) => onTrack(event));

  await viewer.connect({
    peerConfig: {
      encodedInsertableStreams: true,
    },
  });
}
When a new metadata is received, this code will trigger the JavaScript event metadata in the window.
Supporting Non-SEI Metadata for Native Platforms
Using the Native SDK you can embed metadata with the frame. The way this metadata is embedded allows playback video players to be backward compatible even if they are unable to read and display the metadata.
You can find a more complete C implementation example in the millicast/metadata-publisher-demo project.
If you have specific requirements for the version of libwebrtc in use for your platform contact us for additional implementation details.
Enable frame transformer
When the transformer is activated, it will enable inspection of frames for additional metadata appended.
enable_frame_transformer(true);
Listen for transformable frame callback
When the frame is being transformed, a callback is fired allowing additional data to be stored. This example demonstrates storing an x,y position as metadata that might reflect the location of an object in the frame. Note that there is a 4-byte sequence that helps identify the remaining data encoded in the frame is metadata.
// Set the length of the user data in the last 4 bytes as a signal to unpacking
// the data during playback
void encode(int32_t value, std::vector<uint8_t>& data)
{
    data.push_back((value >> 24) & 0xff);
    data.push_back((value >> 16) & 0xff);
    data.push_back((value >> 8) & 0xff);
    data.push_back(value & 0xff);
}

// Add metadata at the end of the frame data
void on_transformable_frame([[maybe_unused]] uint32_t ssrc, [[maybe_unused]] uint32_t timestamp, std::vector<uint8_t>& data) override
{
    constexpr uint8_t SPEED = 10;

    if (pos_x == width || pos_x == 0)
    {
        dir_x *= -1;
    }

    if (pos_y == height || pos_y == 0)
    {
        dir_y *= -1;
    }

    pos_x += dir_x * SPEED;
    pos_y += dir_y * SPEED;

    pos_x = std::clamp(pos_x, 0, width);
    pos_y = std::clamp(pos_y, 0, height);

    encode(pos_x, data);
    encode(pos_y, data);
}
Troubleshooting
Missing Metadata in Chrome
Starting with Chrome version m128, the H.264 depacketizer introduced a bug leading to problems with SEI messages during packet loss. The typical symptoms are low frame rate on Chrome but not on Safari (Mac) or Firefox. The use of SEI messages combined with any level of packet loss may lead to significant playback issues. Customers trialing our DRM solution will also be affected.
See the Playback issues with SEI Messages in H.264 knowledge base article for more details on solutions and impacted versions.
Learn more
You can find some additional examples of exchanging data during a broadcast and other messaging examples from the developer blog.